One day you can tell your grandkids about it
I’ve already talked about how you can burn CDs and DVDs in Windows, so now it’s time to learn how to burn discs in OS X. It’s worth noting that even though you can burn Blu-ray discs in Windows, you can’t in OS X because no Mac computers include built-in Blu-ray support.
This really isn’t a big deal because most Windows computers don’t have Blu-ray burners either and most people still burn DVDs and CDs. Also, judging by how Apple completely removed the optical drive from the new MacBook and MacBook Air, burning CDs and DVDs on Macs is probably going to be a thing of the past pretty soon whether you like it or not.
Now when it comes to burning discs on a Mac, there are usually a couple of scenarios: burn a data disc or ISO image, burn an audio CD or burn a video DVD playable in a DVD player. Depending on what type task you need to complete, you may have to use different software.
In this article, I’ll talk about how you can burn a disc in OS X for multiple purposes. I’ll also mention some alternatives for Mac that you can use to burn CDs and DVDs. Unfortunately, with Macs, you just have fewer choices. For example, Apple has iMovie for making awesome edited movies, but you can’t use iMovie to burn a DVD!
Burn a Data Disc or ISO Image
Let’s start with the easy stuff first: burning a simple data disc or an ISO image file. For an ISO image, check out my previous post on burning ISO images using OS X. Burning a data disc is also really easy.
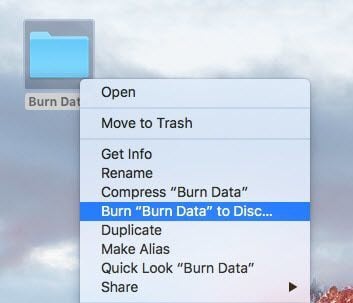
The first thing you need to do is copy all the data you want to burn into a folder. It really doesn’t matter where the folder is located or what name you give the folder; it should just all be in one place.
Now just right-click on the folder and choose Burn “Folder Name” to Disc. If you don’t already have a disc in the optical drive, you’ll get a message asking you to insert one.
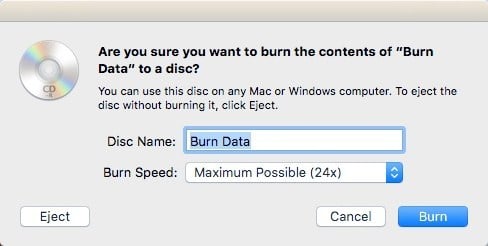
Next, you can give your disc a name and choose the burning speed, which should automatically be set to the max speed.
Click Burn and the CD or DVD will begin to be burned. For data discs, it’s as simple as that.
Burn Audio CD
In Windows, you can burn an audio CD using Windows Media Player. On a Mac, you can burn audio CDs using iTunes. Open iTunes and add all your music to your library. Once you have added your music, you need to create a playlist.
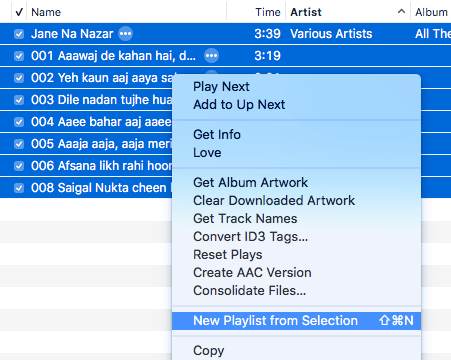
Go ahead and select the songs you want on your audio CD, right-click and choose New Playlist from Selection. Note that if you are going to burn an audio CD, you can only have up to 72 minutes of audio. If you are burning an MP3 CD, you can add up to 700 MB worth of MP3 files.
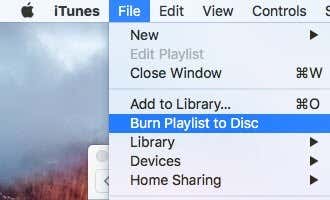
Now you should see your new playlist in the left hand side under Playlists. Click on the playlist to select it. Now click on File and choose Burn Playlist to Disc.
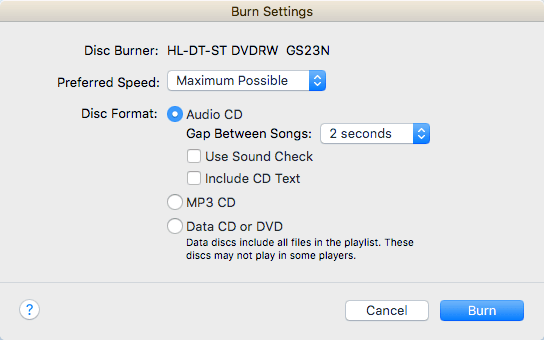
The Burn Settings dialog will appear where you can choose how you want to create your audio CD.
The main section is Disc Format, where you can choose from an Audio CD (72 minutes), an MP3 CD (700 MB) or a Data CD/DVD. For an audio CD, you can choose how long the gap between songs should be, use Sound Check to make sure the volume is consistent across all songs and include CD text so that the song name, artist, etc. are displayed on disc players.
Burn Video DVD
In Windows, you can burn a DVD using Windows DVD Maker or a third-party program if you don’t have Windows 7, but on Mac there is no official software from Apple for burning DVDs. There used to be iDVD Author, but that was part of iLife 11, which you can still buy, but it’s old and probably not worth the money.
For Macs, you don’t have a lot of options. The only free program I can recommend is Burn, which also hasn’t been updated since 2011, but works well enough for most people. First, go ahead and download the software and then run the application. If you get a message stating the program is blocked because of your security settings, then go to System Preferences, click on Security and Privacy and click on Open Anyway.
Once the program is open, you’ll want to click on the DVD tab. Give your DVD a title and then click on the drop-down box and change the format from VCD to DVD-Video. Next, click on the little plus icon at the bottom left to add video to your project.
Note that if you video is not in the correct format, you will get a message saying it is incompatible and asking if you would like to convert it to the proper format. You need to have videos in MPG format in order to use this program.
Click the Convert button and the file will be converted for you automatically. If you can’t convert using this program, use a program like HandBrake to convert the files for you.
Once you have added all your files, go ahead and click the Burn button to start the burn process.
That’s about it! It’s not fancy and the navigation controls for the DVD are pretty basic, but it gets the job done for free. If you are interested in creating custom themes for your DVD, customizing text and buttons, etc., then you’ll need to shell out some money for a DVD authoring program.
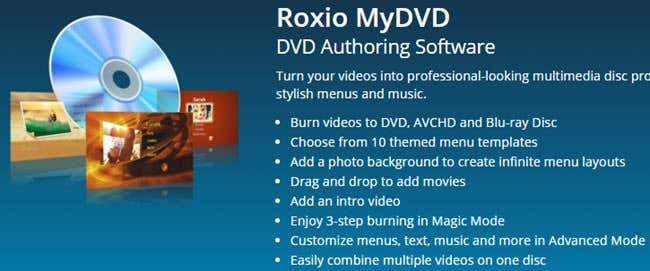
The most popular ones for Mac are Roxio MyDVD for $49.99 and Voilabits DVDCreator for $39.99. Roxio has been around for ages and their software is excellent.
For $10 less, DVDCreator is also an excellent choice for authoring DVDs. You can purchase MyDVD from here and DVDCreator from here. Both programs are also priced fairly considering they are pretty feature-rich.
Troubleshooting
A quick frustration I wanted to mention was if you run into problems when burning a disc on your Mac. For whatever reason, the SuperDrive is a super piece of crap on most Macs and doesn’t burn discs properly a lot of times.
The most common error you’ll get is the following:
The disc can't be burned because an unexpected error occurred (error: 0x8002006E)
The only solution according to folks in the Apple forums is to buy an external DVD writer and use that instead. It’s pretty sad, but it’s not a top priority for Apple and that’s why they are removing the drives from their computers anyway.
If you can’t get another drive, try recording at a slower speed (maybe 1x or 2x) and try a different type of DVD. The drive is supposed to support +R and -R, but I sometimes find one format works better and doesn’t fail as often as the other. It’s a lot of trial and error.
Hopefully, this article will help you burn what you need on OS X. If you have any questions, feel free to comment. Enjoy!

