The fix that worked for us, plus a few others you can try
Does your Windows PC display a “USB device not recognized” error when you plug in a USB device or accessory? Your USB ports are functional (they charge/power any device), but they won’t recognize devices for data/file transfer. This tutorial explains why Windows occasionally fails to recognize or detect USB devices and how to fix the issue.
Why Your USB Devices Are Not Being Recognized
Windows may fail to recognize USB devices for many reasons. The “USB device not recognized” error could be due to a faulty cable connection, corrupt USB drivers, or an outdated operating system. Your PC’s power management settings can also interfere with detecting USB devices.
Connect the USB device to a different Windows PC and check if it works. If other Windows computers detect and recognize your USB device, safely eject the device and reconnect it to your computer. If the affected USB device is an external hard drive, printer, or camera, connect it to your PC using a different USB cable.
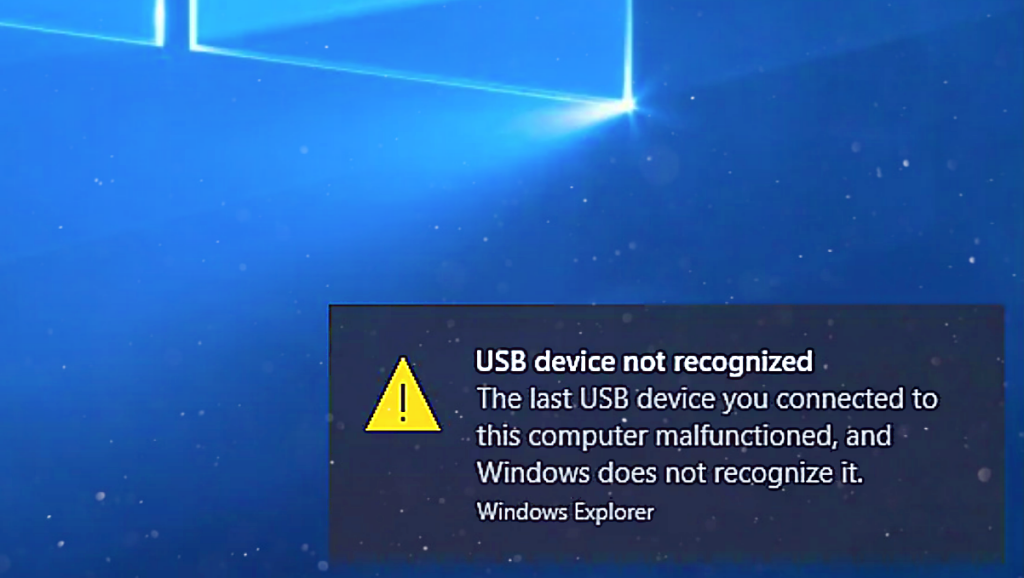
Getting your computer to detect functional USB devices should be easy. Try the troubleshooting recommendations in the next section if Windows repeatedly throws the “USB device not recognized” error.
Watch our YouTube video below for additional tips on fixing unrecognized USB devices in Windows.
Reboot Your Computer
Rebooting our test device resolved the “USB device not recognized” error. We recommend rebooting your PC before trying other complex fixes like reinstalling USB drivers.
Close all open applications before rebooting Windows to avoid losing unsaved data or files. Also, unplug any USB device connected to your PC before performing the system reboot.
Press the Windows key, select the Power icon, and choose Restart.
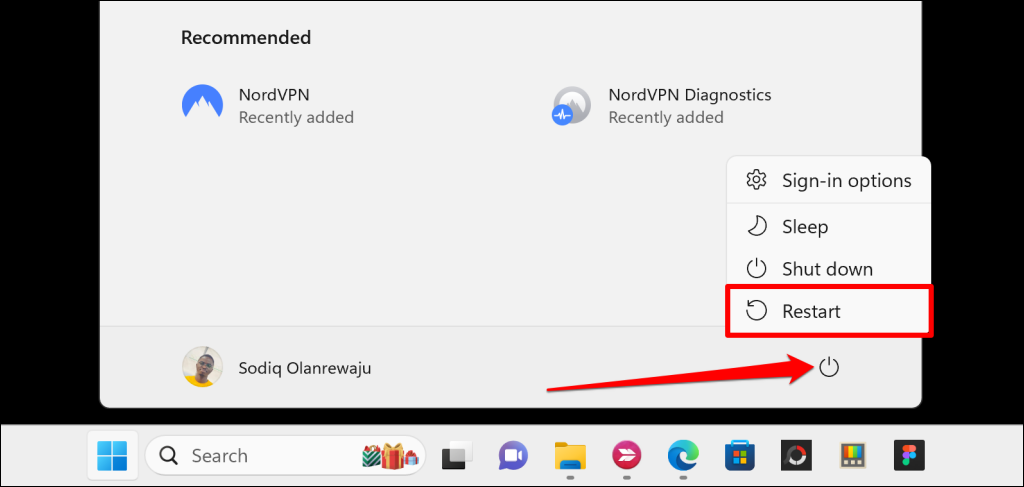
Wait about 3-5 minutes for your computer to shut down, and press the Power button to turn it back on. If you use a desktop computer, perform a hard reboot by unplugging the power supply from the wall outlet.
Wait a few minutes, reconnect the power supply to the outlet, and turn on your PC. Windows should start recognizing USB devices after the reboot. Update your USB drivers if the “USB device not recognized” error persists.
Update USB Device Drivers
Your computer may have trouble detecting USB devices if its USB drivers are corrupt or outdated. Plug the affected USB device into your PC, head to the Windows Device Manager, and check for an update for the device’s driver.
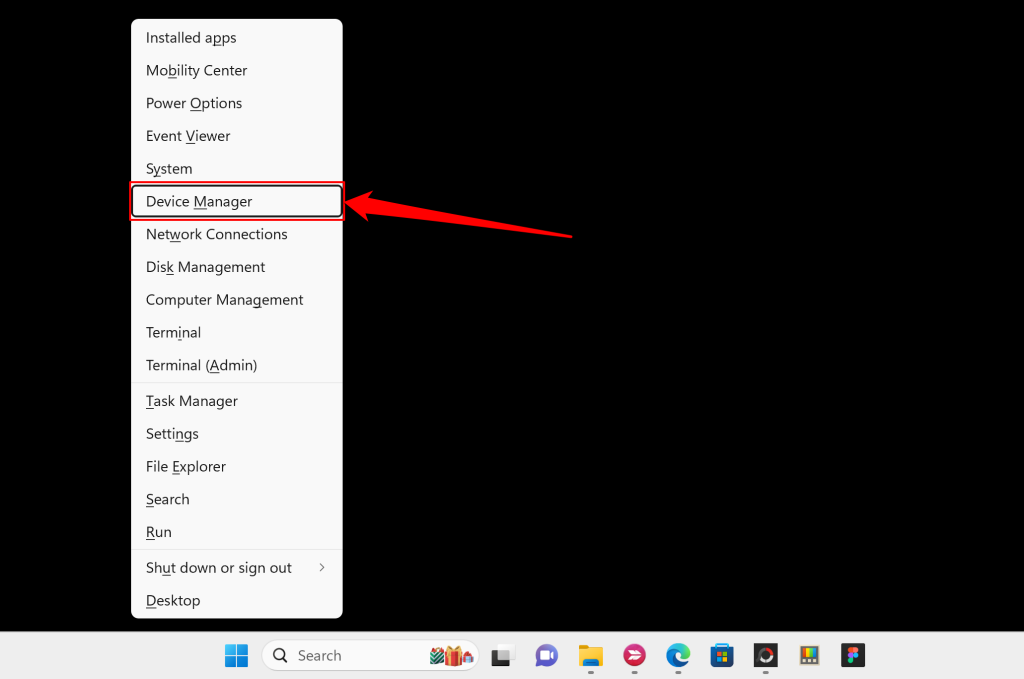
- Right-click the Start menu (or press the Windows key + X) and select Device Manager on the Quick Link menu.
- Locate the USB device in the “Universal Serial Bus controllers” or “Universal Serial Bus devices” categories. Right-click the affected USB device and select Update driver.
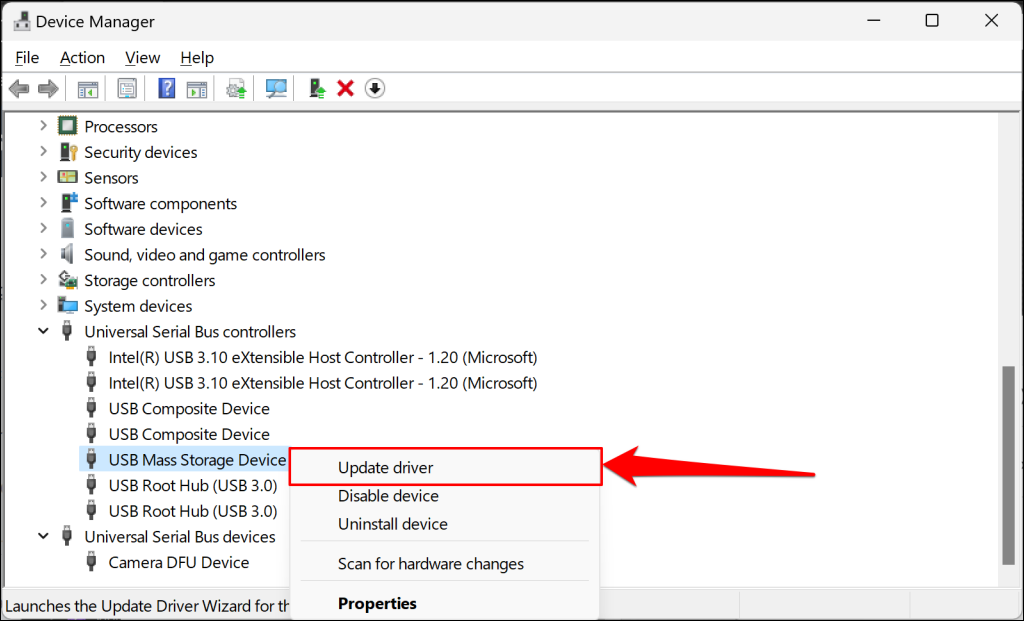
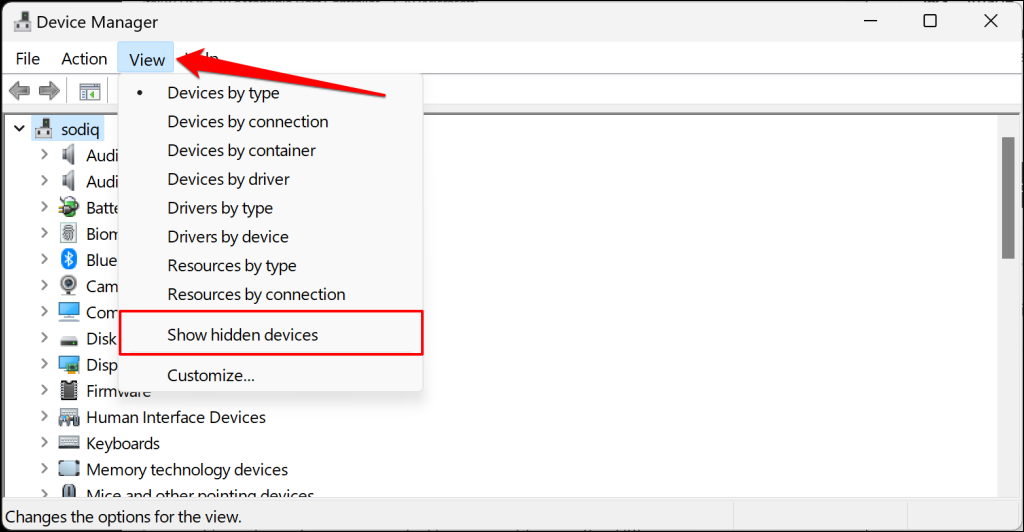
Quick Tip: Your device’s driver may be hidden if it’s missing in the “Universal Serial Bus controllers” or “Universal Serial Bus devices” categories. Select View on the Device Manager top menu and select Show hidden devices.
- Select Search automatically for drivers.
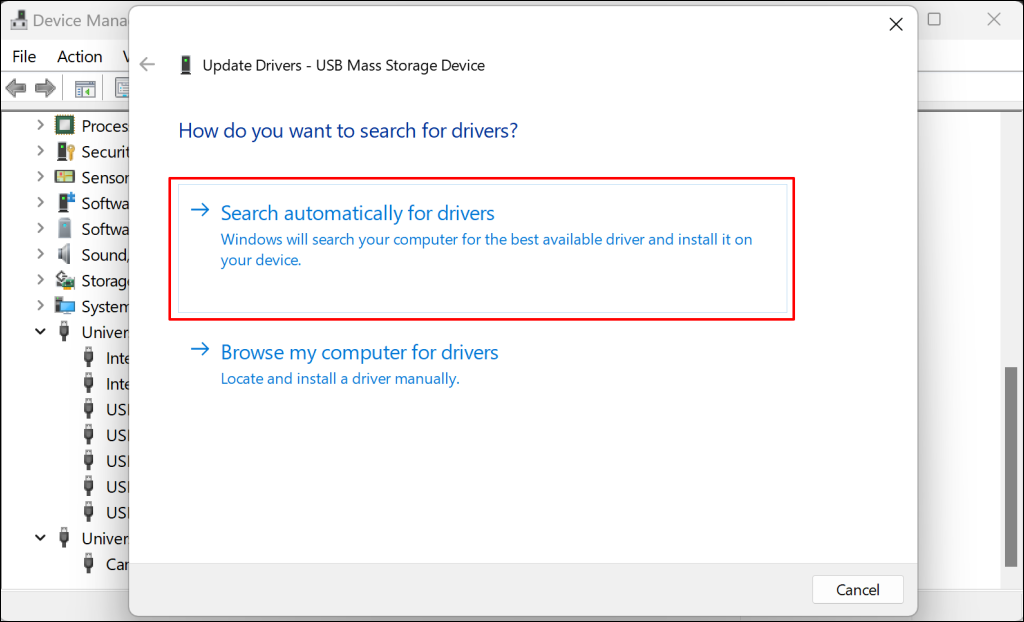
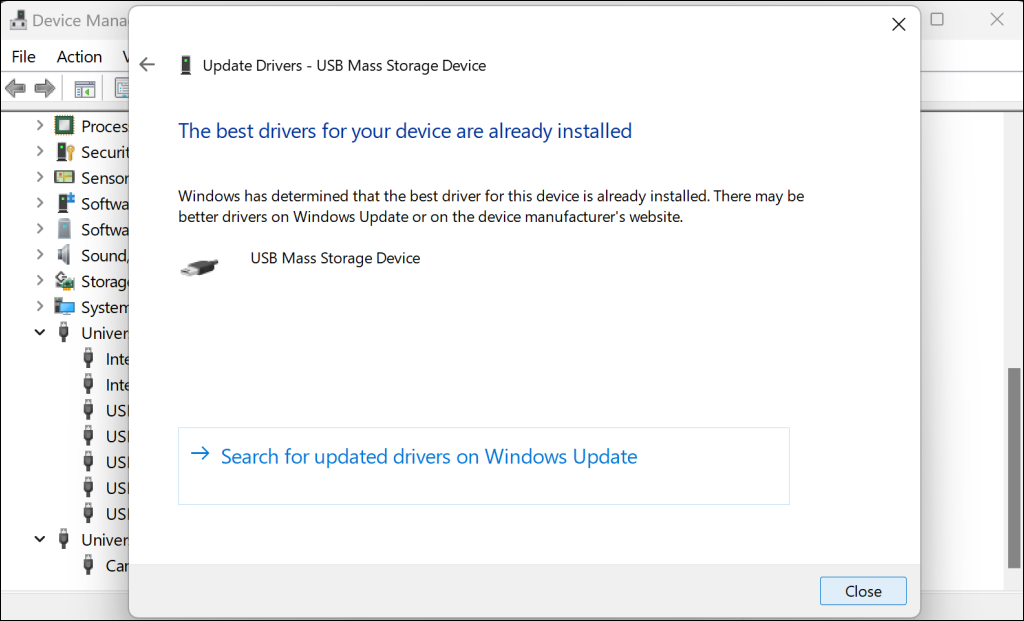
That’ll prompt Windows to search your PC’s driver database and Windows Update downloads for any new driver version. If Device Manager says you have the best driver from the USB device, head to the device manufacturer’s website to verify.
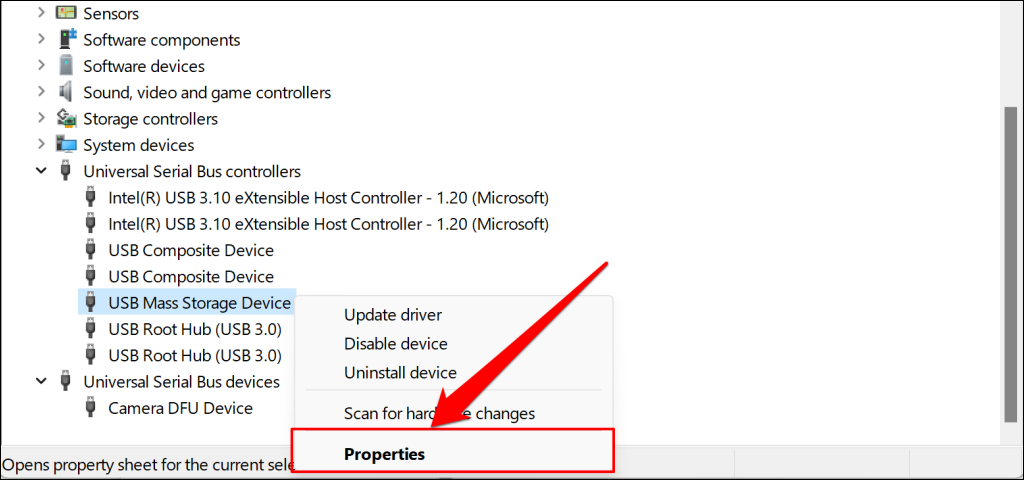
To check the USB device’s driver version, right-click the driver and select Properties.
Open the “Driver” tab and check the “Driver Version” row for the USB device’s driver version.
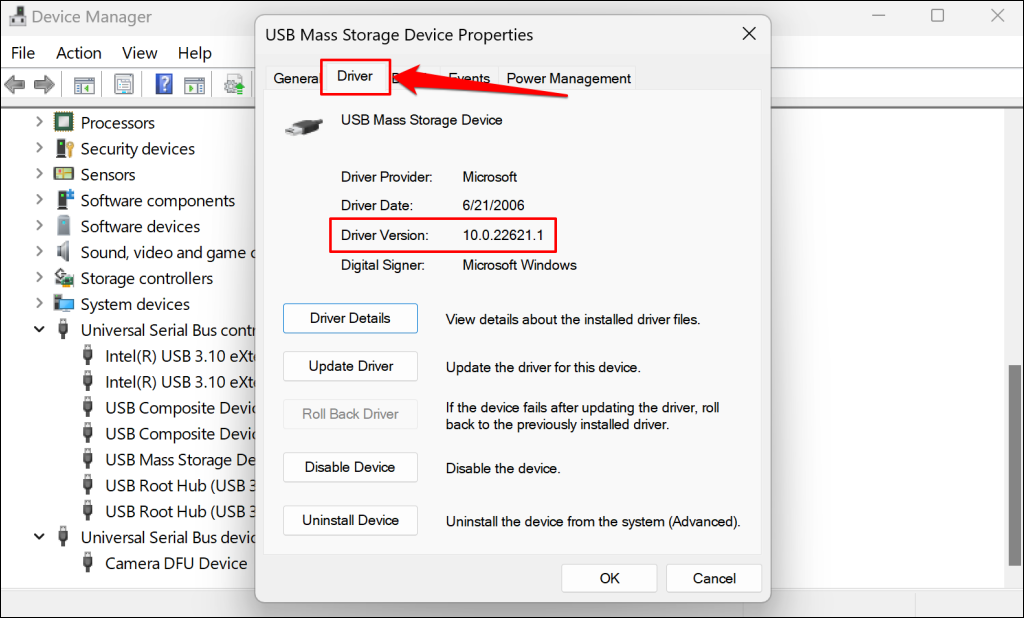
If the device has a new driver version on the manufacturer’s website, download and install it on your PC. You can also use third-party apps or utilities like DriverPack, SlimDrivers, or DriverHub to update your device drivers.
Update Your Computer
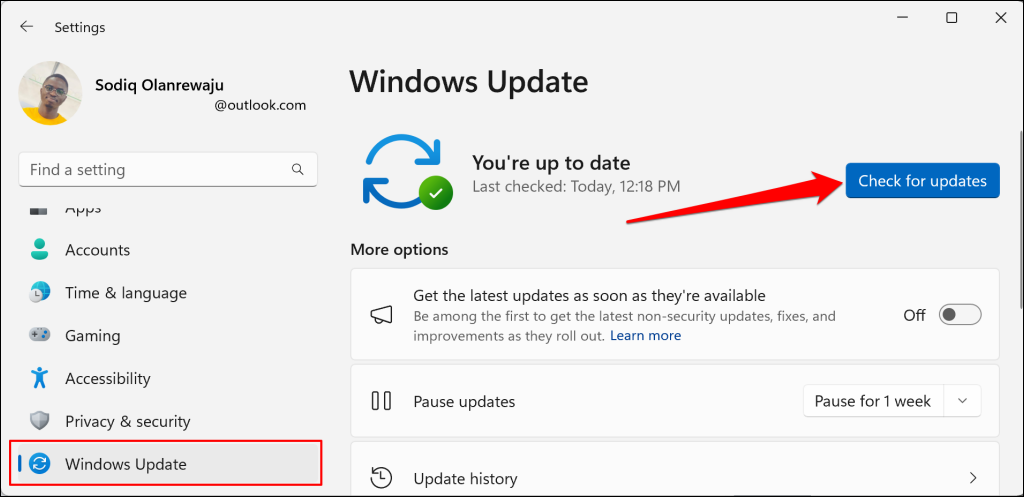
Windows Updates sometimes include firmware updates for device drivers. Connect your PC to the internet, head to the settings menu, and install any available Windows Updates.
Open the Settings app, select Windows Update on the sidebar, and select Check for updates.
Disconnect or Restart the USB Device
If you can restart the affected USB device (e.g., printer, camera, etc.), unplug it from your PC and restart it. Rebooting the device could eliminate temporary glitches preventing Windows from recognizing it.
Unplug other USB devices from your PC and reconnect the affected USB device. Plug the device into different USB ports if the “USB device not recognized” error persists.
Re-enable the USB Root Hub
Microsoft recommends disabling and re-enabling the USB Root Hub when USB devices stop functioning correctly in Windows.
- Press the Windows key + X and select Device Manager on the Quick Link menu.

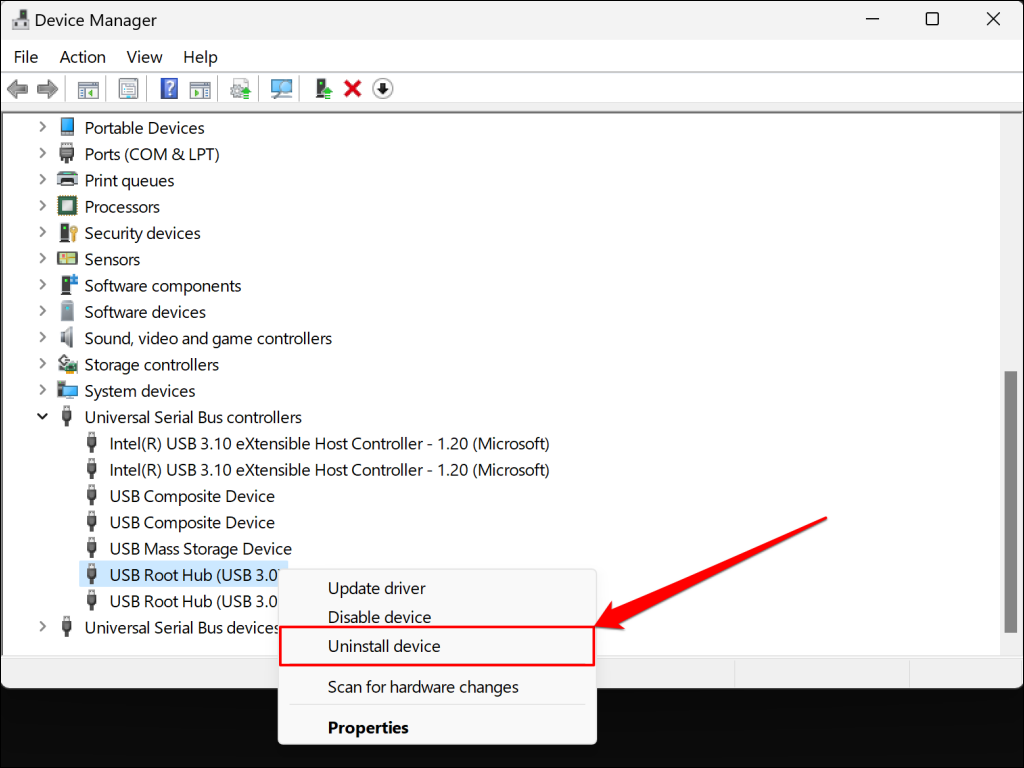
- Expand the “Universal Serial Bus controllers” section, right-click any USB Root Hub driver, and select Uninstall.
- Select Uninstall on the confirmation pop-up to proceed.
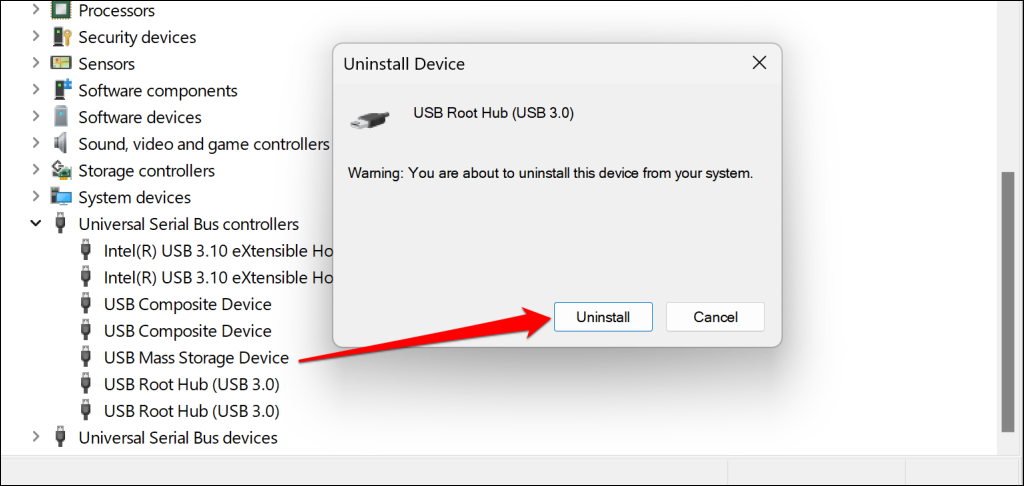
Uninstall all USB Root Hub drivers in the “Universal Serial Bus controllers” category and reboot your computer. Windows will automatically reinstall the USB Root Hub drivers when your PC restarts. Turn off “Selective Suspend” for your computer’s USB ports if the “USB device not recognized” error persists.
Disable Selective Suspend for USB Ports
Windows sometimes suspend or turn off connected USB devices to preserve battery power. The feature is known as “Selective Suspend.” The problem with Selective Suspend is that Windows sometimes fails to wake the USB device correctly, causing the “USB device not recognized” error and other issues.
Turn off Selective Suspend for your USB ports/drivers if Windows doesn’t detect or recognize your USB devices. Unplug the affected USB device from your PC and follow the steps below.
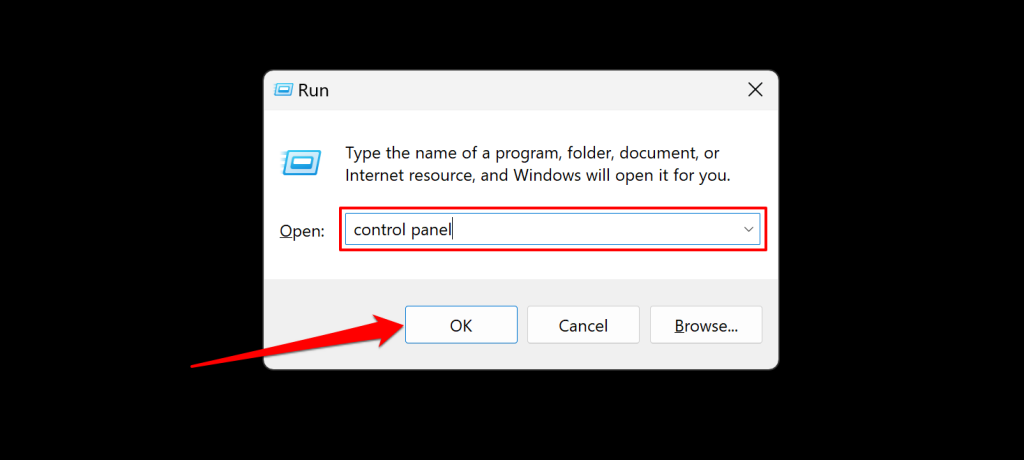
- Open the Windows Run box (Windows key + R), type control panel in the dialog box, and select OK. That’ll open the Control Panel.
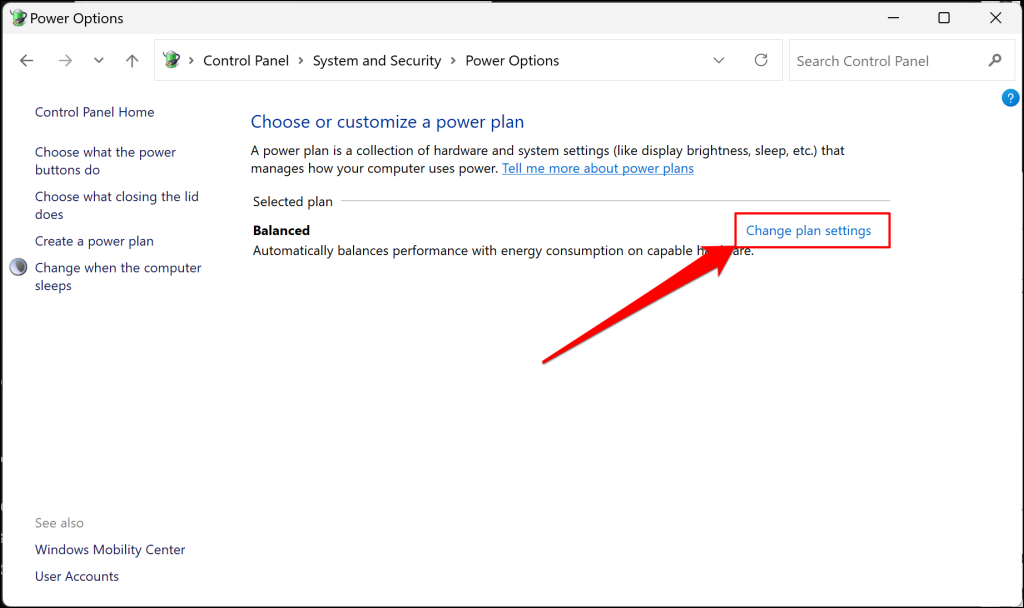
- Go to System and Security > Power Options and select Change plan settings.
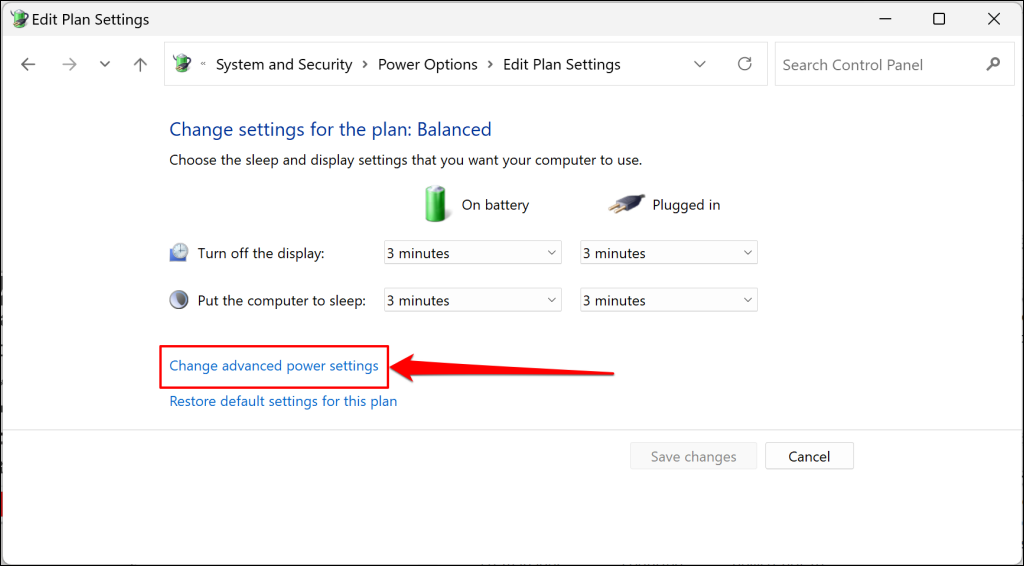
- Next, select Change advanced power settings.
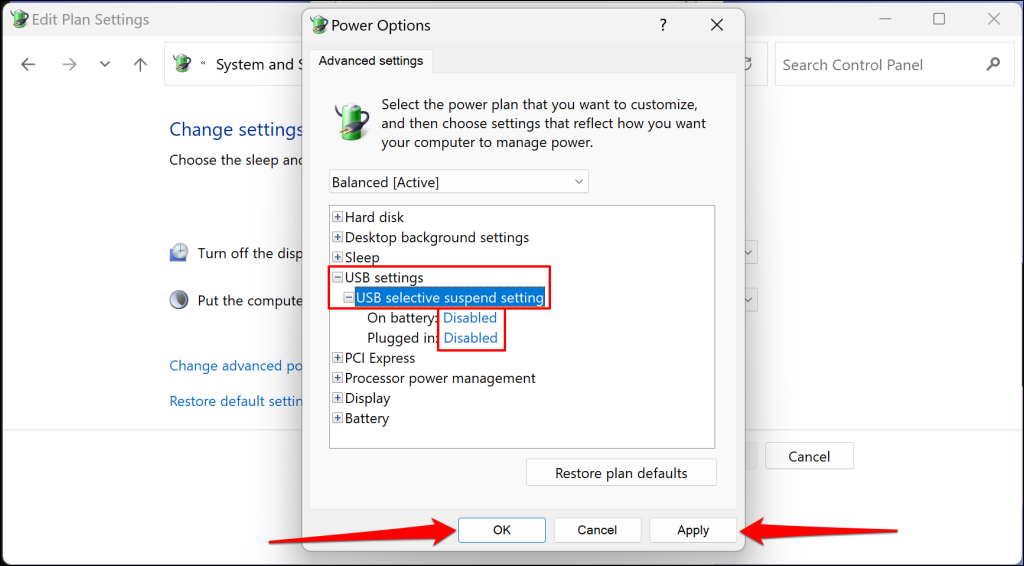
- Expand the USB settings category and double-click USB selective suspend settings. Set the “On battery” and “Plugged in” options to Disabled and select Apply > OK.
If you don’t see the “USB settings” option in the “Power Options” window, run the command below in an elevated Command Prompt window:
REG ADD HKLMSYSTEMCurrentControlSetControlPowerPowerSettings2a737441-1930-4402-8d77-b2bebba308a348e6b7a6-50f5-4782-a5d4-53bb8f07e226 /v Attributes /t REG_DWORD /d 2 /fCheck the Power Options window for the USB settings option when you see a “The operation completed successfully.” success message.
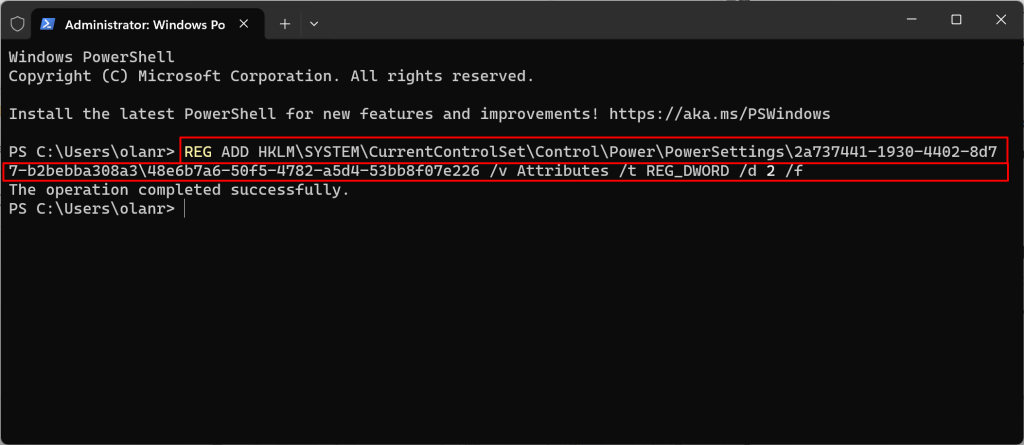
After disabling USB Selective Suspend, connect the USB device and check if Windows recognizes it.
Connect USB Devices Directly to Your PC
Windows might fail to recognize devices connected to your PC through faulty or knockoff USB hubs or adapters. Disconnect your device from any USB hub/adapter and plug it into your PC’s USB port.
If you must use a USB hub/adapter, ensure it can supply enough power to your USB devices or accessories.
Run the USB Troubleshooter
The Windows Get Help app has a built-in USB troubleshooter that provides do-it-yourself (DIY) instructions and recommendations for USB device troubles. Run the troubleshooter to fix your computer’s “USB device not recognized” error.
- Open the Start menu, type help in the search box, and open the Get Help app.
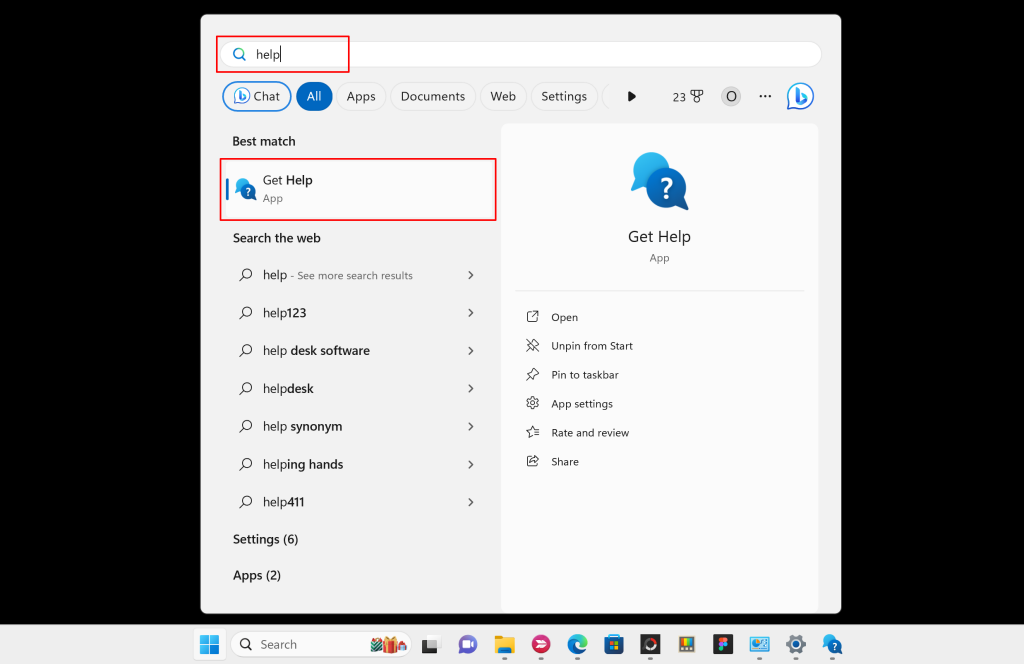
- Type “USB device not recognized” in the search box and select USB not recognized in the suggestions.
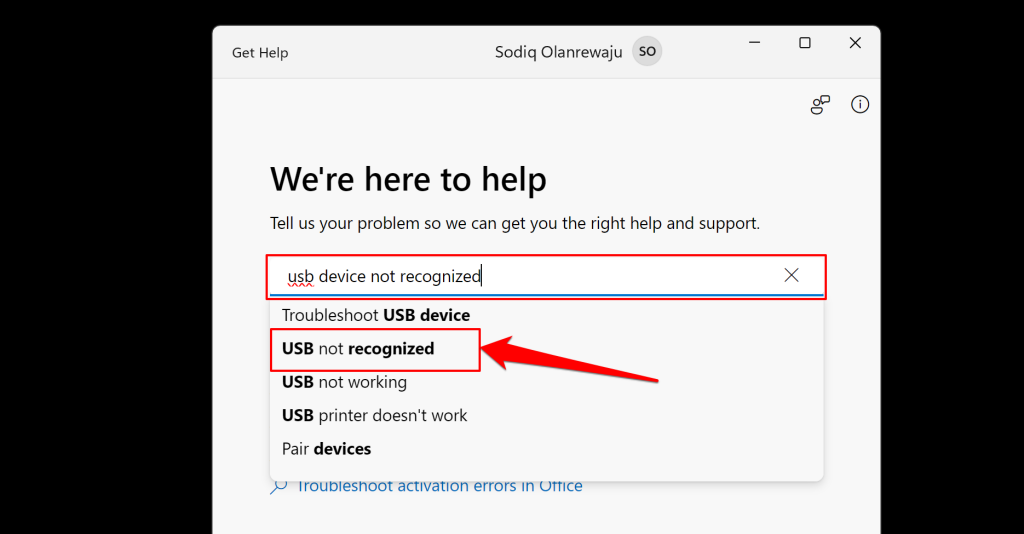
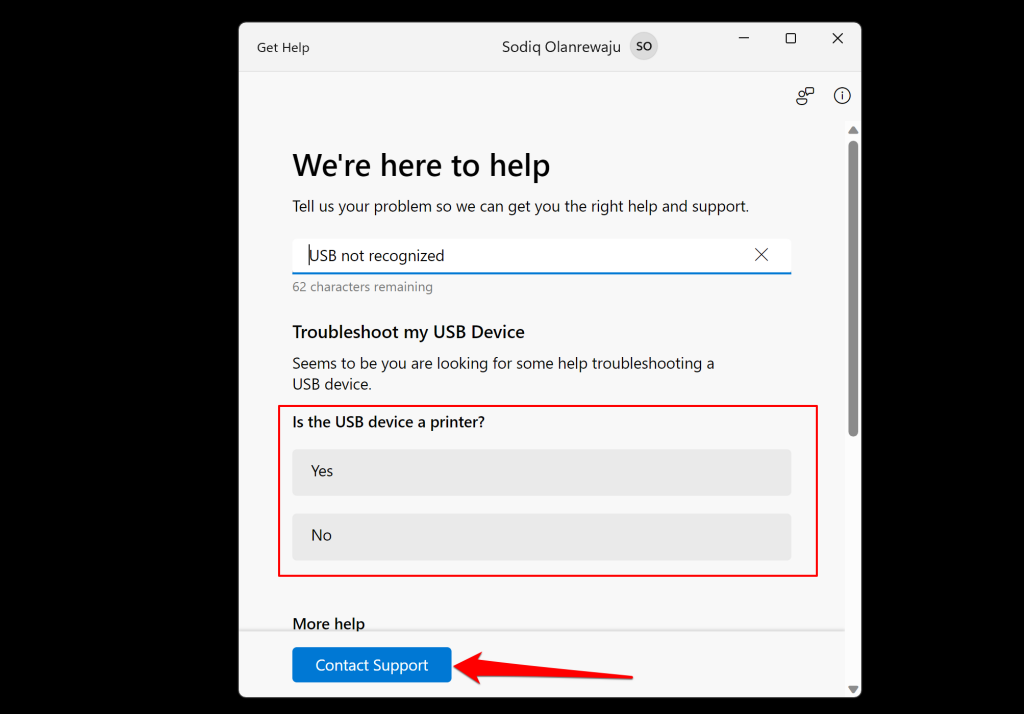
Answer the on-screen questions to get tailored troubleshooting instructions and recommendations. Select the Contact Support button to speak with a Microsoft Support agent if the troubleshooter doesn’t provide a resolution.
“USB Device Not Recognized “Error: Other Possible Solutions
If nothing has worked, it’s safe to assume the issue could be due to hardware-related—perhaps physical damage to your computer’s USB ports or the affected USB device. If the USB device is a storage drive, Windows probably doesn’t support its file format.
For instance, Windows won’t recognize or read drives formatted using Apple’s HFS+ or APFS file systems. If Windows won’t recognize your USB drive but it works on Mac computers, format the drive to Windows-compatible file systems like FAT32 or NTFS.
Update your Basic Input/Output System (BIOS) or take your PC to a repair shop if none of the troubleshooting tips in this tutorial stops the “USB device not recognized” error.


