So you can view in an image editor
Modern websites are responsive and appealing to view, but their biggest advantage is speed. The faster a page (and all of its assets) loads, the better the user experience. That’s why web developers are ditching old image file formats like PNG, GIF, and JPG, for web-friendly alternatives like Google’s own WebP.
Unfortunately, it remains difficult to edit or view WebP files in most major image editors. The best way to manipulate a WebP file is to convert it to the commonly-used GIF format instead, which you can use for both animated and static images. If you want to convert WebP to GIF, here’s what you need to do.
What Is a WebP file?
Developed by Google, WebP is a file format created to help reduce the size of image assets on web pages without reducing the overall quality by too much. WebP files are up to 26% smaller than equivalent PNG files, while JPG files can be reduced in size by over 30%.
This helps reduce the time it takes to load web pages, especially on asset-heavy pages with a large number of images. This allows you to quickly speed up your website. WebP files can also replace GIF files for animated images, compressing the contents by up to 64% versus traditional GIFs.
All major web browsers, including Chrome, Firefox, Safari, and Microsoft Edge support the WebP file format. However, if you want to view WebP files elsewhere (for example, on your smartphone or outside your browser), you may need to convert the file to another commonly-used format.
This is especially true if you’re looking to edit the file, as most image editors lack direct support for WebP files. If you’re dealing with an animated WebP file, for example, you can convert WebP to GIF on your Windows PC or Mac using the steps below.
How to Convert WebP to GIF on PC or Mac Using Photoshop
If you’re an Adobe Photoshop user, you can’t edit a WebP file directly without first adding WebP support using a third-party plugin called WebPShop. This will allow you to open the file, modify the image directly, and convert it to a more widely-supported format like GIF.
If you want to convert WebP to GIF using Photoshop, here’s what you’ll need to do. These steps have been written with Photoshop 2021 in mind, but may work for older versions of the software.
Installing the WebPShop Plugin
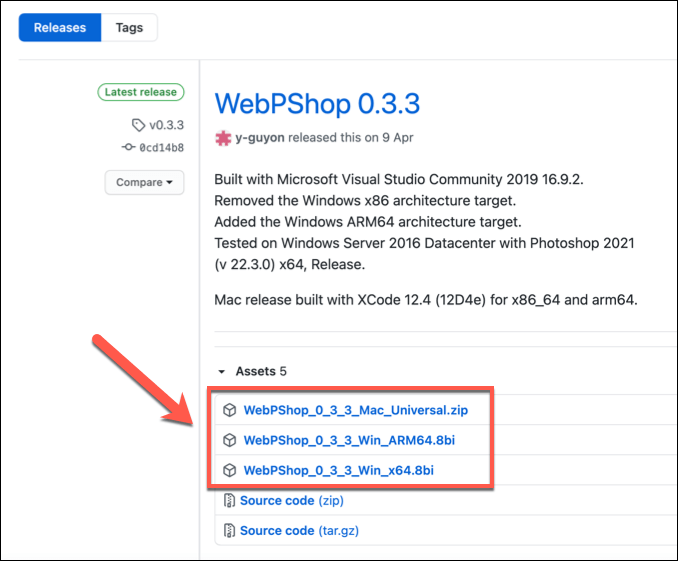
- To install the WebPShop plugin, you’ll need to first download the latest version from GitHub for your operating system.
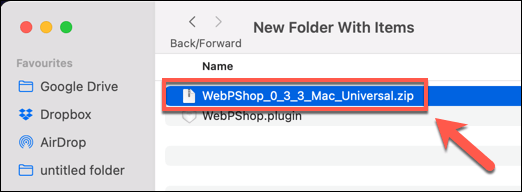
- If you’re using a Mac, first unzip the installation file by locating the file in the Finder app and double-clicking it. The file will be extracted automatically. Windows users can skip this step.
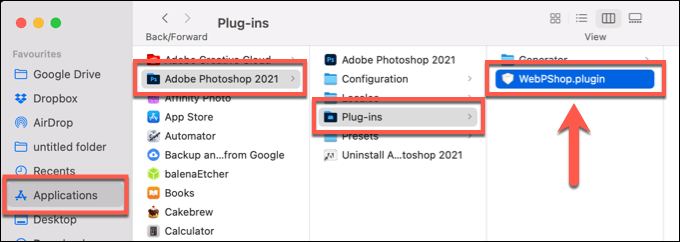
- Windows users will need to move the plugin file (in the 8bi file format) to the C:Program FilesAdobeAdobe Photoshop 2021Plug-ins folder to install it. Mac users will need to move the file (in the plugin file format) to Applications/Adobe Photoshop/Plug-ins/ instead.
- Mac users will need to authorize access to the plugin. Open the Terminal app to do this and type sudo xattr -r -d com.apple.quarantine /Applications/Adobe Photoshop 2021/Plug-ins/WebPShop.plugin to allow this. Windows users can skip this step.
- If Photoshop is already open on your PC or Mac, close it and re-open it to activate the plugin.
Converting WebP to GIF using Photoshop
Once you’ve installed the WebPShop plugin, you can open your image file in Photoshop to convert it from WebP to GIF.
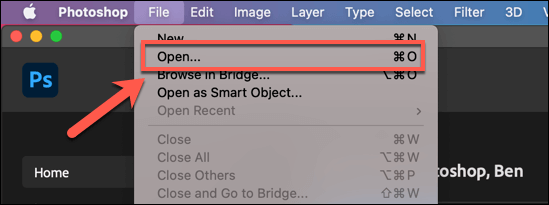
- To do this, open Photoshop and select File > Open to locate your file. If the plugin is active, you should be able to select and open files in the WebP format. If you can’t, repeat the steps above to ensure the plugin is installed and activated correctly.
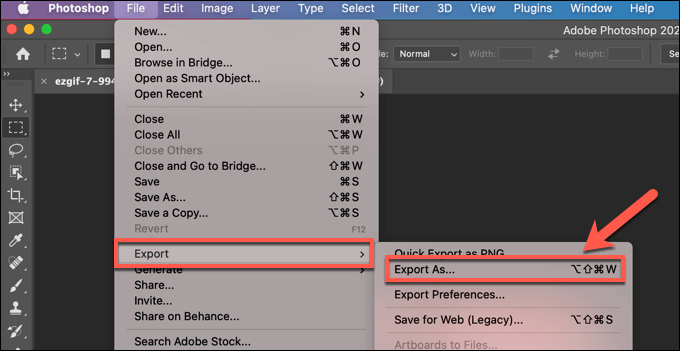
- At this point, your WebP file should open in Photoshop for you to view and edit. If you’re opening an animated WebP file, each frame will appear in the Layers tab, allowing you to select and edit these individually. When you’re ready to convert the WebP file to GIF, select File > Export > Export As.
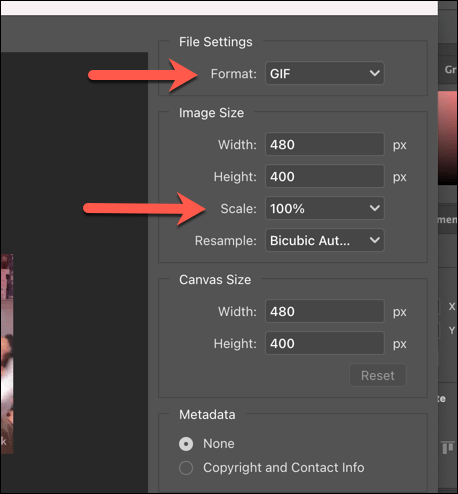
- In the Export As menu, select GIF from the Format drop-down menu in the top-right. If you want to scale your GIF file up or down, use the Scale drop-down menu below it. Make any other changes to your file as required.
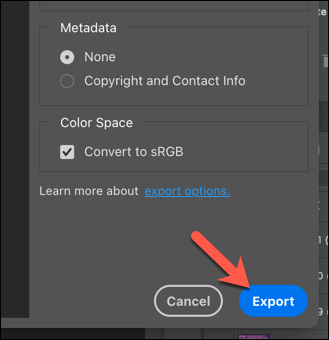
- To export the file, select Export in the bottom-right, then select a suitable file name and save location for your GIF file.
After a few seconds, your newly converted GIF file will appear in your chosen save location. You can then open it on your PC or Mac using an image viewer app such as Microsoft Photos (for Windows) or Preview (for Mac).
How to Convert WebP to GIF Files Online
If you don’t have Photoshop installed (or you run another operating system like Linux), you can quickly convert WebP to GIF files using online conversion services instead.
These services require you to upload your image to a server where the conversion process can be performed for you. We advise against this for any personal image files you have, however. While most web services suggest they don’t store the images, that isn’t guaranteed.
Various online services exist for this service, but one of the most commonly used is Ezgif.com, which has an online WebP to GIF conversion tool that you can use for free.
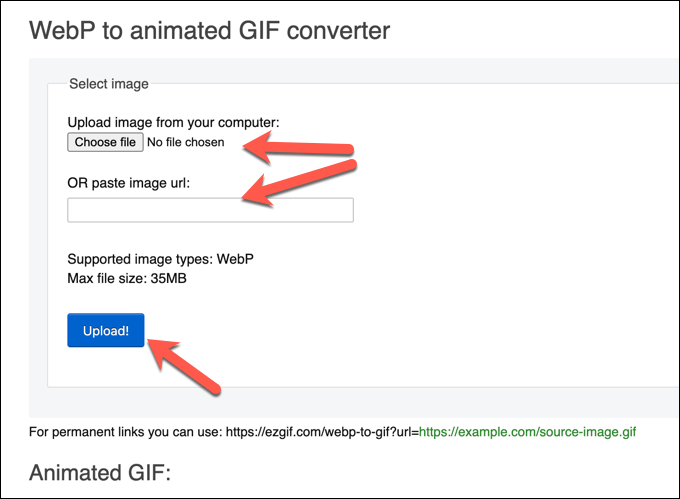
- To convert your WebP files, open the Ezgif WebP to GIF conversion tool in your web browser. Select Choose file to locate your WebP file or, if you want to convert a file online, paste the web URL for the file in the box provided. Select Upload to begin the upload process.
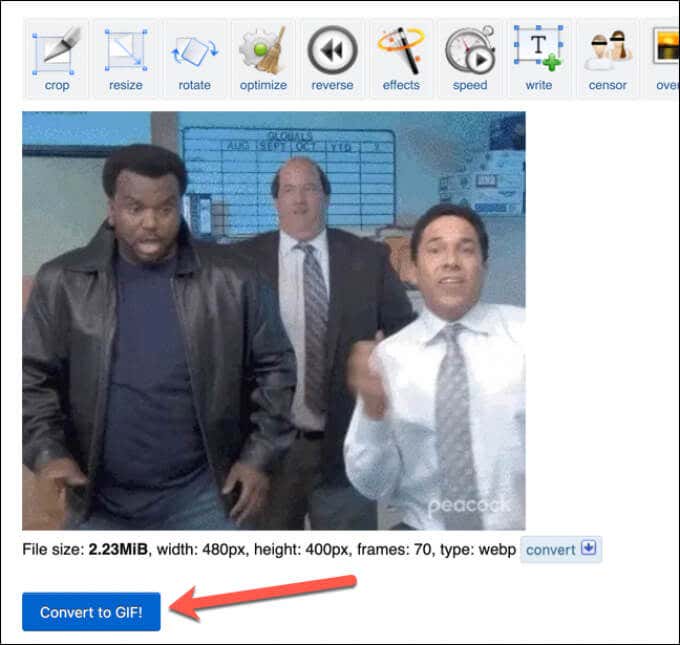
- After the upload process is completed, you’ll see a preview of the animated or static WebP file. To complete the conversion process, select the Convert to GIF button underneath.
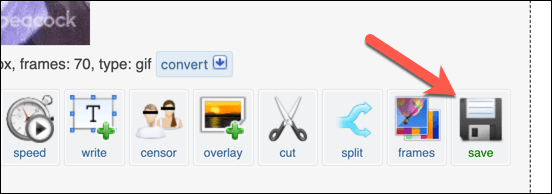
- After a few moments, the converted GIF file will appear in the Animated GIF section underneath. To save the converted file to your PC or Mac, select the Save button in the menu.
Editing Images on Windows and Mac
WebP files are great for the web, but they’re difficult to open, view, and edit elsewhere. If you convert WebP files to GIFs, you’ll be able to open and share your files more widely. You can then use Photoshop or an alternative editor like GIMP to manipulate your GIF layers and make further changes.
If you’re a Photoshop newbie, you could vectorize your image files to make them easier to scale up or down in size or use Photoshop’s powerful editing tools to cut out objects from photos. When you’re finished, you can even add a watermark to your images, allowing you to safely share your creations online.


