Keep your sensitive numbers safe
Microsoft Excel remains the most popular spreadsheet application in the world. Excel spreadsheet data is often sensitive, containing personal or financial data. Understandably, you might consider additional protection for your Excel files, such as a password.
You can password protect any Excel file using several options, including the integrated Excel password tool or third-party Excel password options.

1. Password Protect An Excel Sheet Using Integrated Tool
The first option for Excel password protection is an integrated tool. The entire Microsoft Office suite has a password protection tool you can use to secure your Excel spreadsheets, Word documents, PowerPoint presentations, and so on.
In Excel, head to File > Info. Select Protect Workbook, then Encrypt with Password from the dropdown menu.
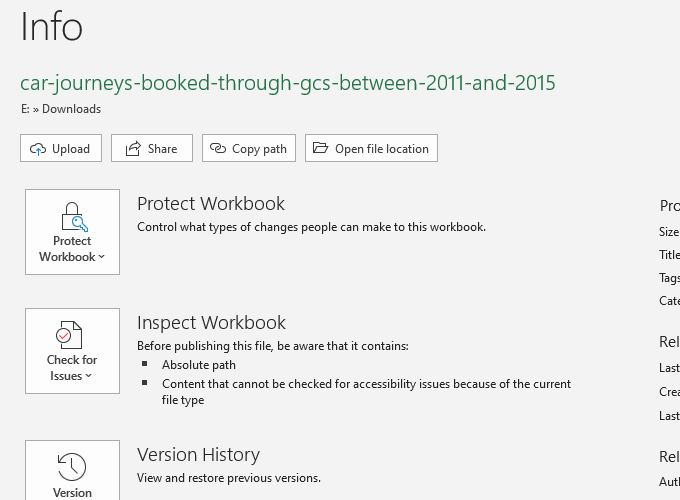
Now, enter a secure password for your Excel spreadsheet. Ensure your password is strong and unique, press OK, then re-enter your password to confirm.
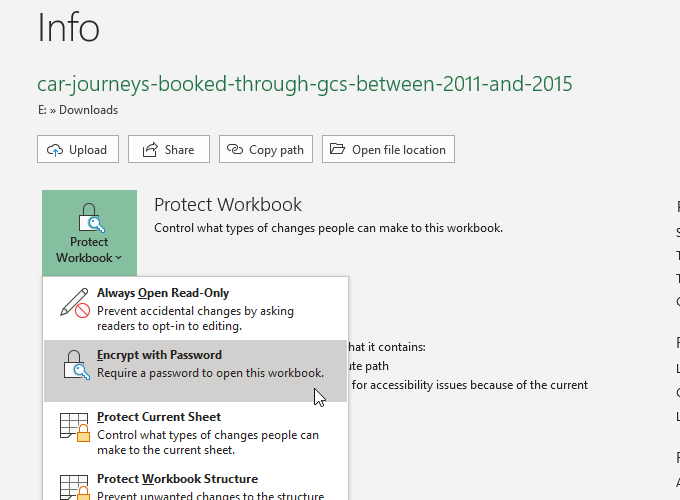
Next time you attempt to open the Excel spreadsheet, you’ll meet the password entry form.
New to Excel? Check out our Microsoft Excel basics tutorial to learn the ropes – fast!
How Secure Is Microsoft Office Password Protection?
Microsoft Office 97-2003 used a very poor encryption standard, known as RC4. The older encryption algorithm has numerous vulnerabilities, which makes cracking the password on an older Excel document incredibly easy.
Microsoft Office 2007-2013 saw an upgraded encryption algorithm, switching to the much stronger AES-128 algorithm. Office 2016-2019 uses the AES-256 encryption algorithm, which is unbreakable within a reasonable timeframe using existing technology.
Extra Excel Protections
Microsoft Excel has a few extra security features, too:
- Mark as Final: Marks the file as complete, which informs other users of the spreadsheet that they should not make any changes. However, marking a spreadsheet as final does not provide any additional password protection.
- Protect Current Sheet: You can add a small additional layer of protection to a specific spreadsheet within your workbook when you password protect an Excel sheet. People with access to the Excel file can still see the spreadsheet but cannot make any changes without the correct password. You can use a different password for this option, too.
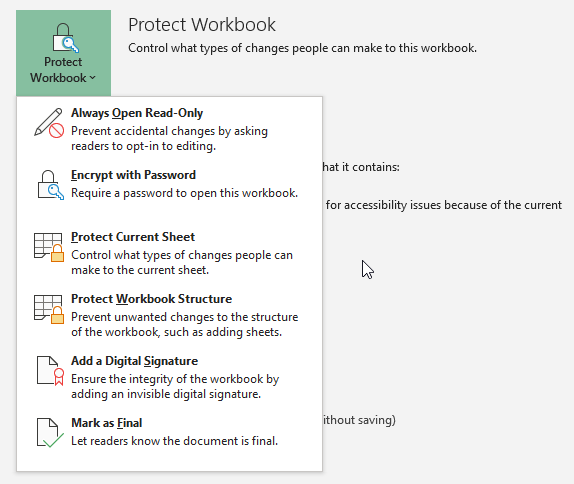
- Restrict Access: An option large organizations can use to restrict access to certain individuals using security templates or other identifiers.
- Add a Digital Signature: The digital signature option verifies that the file remains untampered between the sender and recipient, ensuring the content is the same.
You might use a combination of additional security features alongside the Excel spreadsheet password protection option, especially if you’re sharing an Excel spreadsheet.
2. 7-Zip
A great method for encrypting multiple Excel files at the same time is to use the free archive tool, 7-Zip to password protect multiple Excel files. You can use 7-Zip to encrypt a whole folder of individual Excel files, password protecting an entire selection of Excel spreadsheets rather than one at a time.
First, download and install the latest version of 7-Zip. Once installed, head to the folder containing your Excel spreadsheets. Now, drag your mouse cursor over the files you want to password protect to select them all. Alternatively, hold CTRL and left click to select individual files with your mouse.
After finalizing your selection, right-click and select 7-Zip > Add to Archive to open the 7-Zip archive options. Encryption options are on the right. Enter a strong and unique password, then press OK.
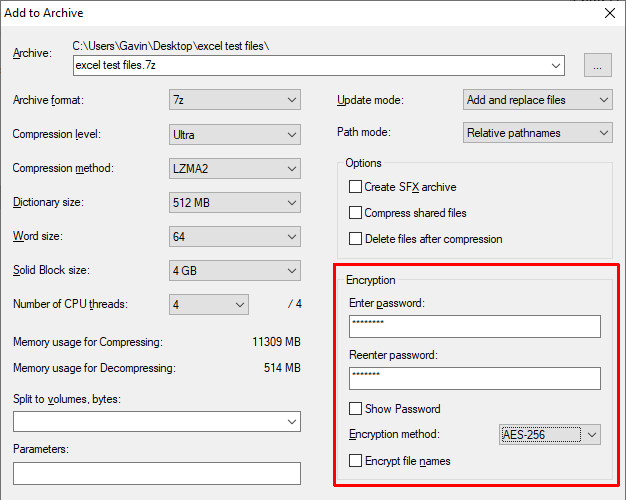
Now, you must enter a password before opening any of the Excel spreadsheets inside the archive. But the spreadsheets outside the archive are not password protected. Select the non-password protected Excel spreadsheets (outside the archive) and delete them.
3. Windows Encrypting File System
The Windows Encrypting File System (EFS) is Windows integrated encryption system for individual files. EFS is unlike Bitlocker, which you use for full disk encryption. Instead, EFS works on a file-by-file basis, perfect for password-protecting an Excel spreadsheet.
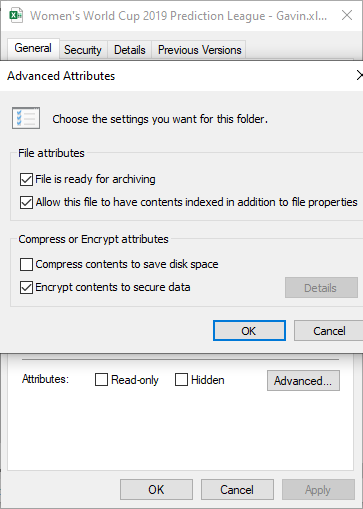
To use EFS to encrypt your file, right-click the Excel spreadsheet and select Properties. Now, select Advanced, then check the box to Encrypt contents to secure data. Press OK, then Apply.
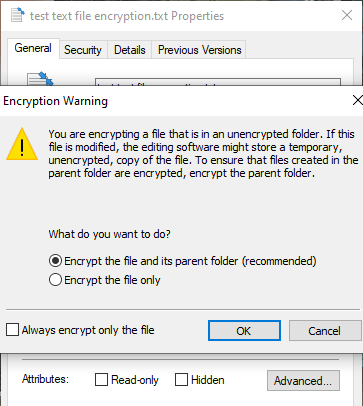
The Encryption Warning will appear. It explains that encrypting a single file can cause an issue under certain circumstances and that encrypting the entire folder offers more protection. If the file is in a frequently accessed folder, you’ll have to unlock the folder each time you want to access any other file. One way around this is to place your text file in a separate folder and use this as your secure folder.
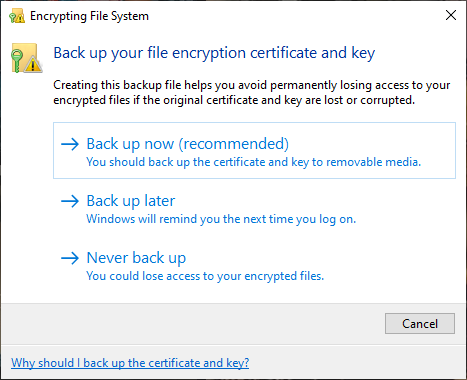
After confirming your selection, the Encrypting File System will ask you if you want to take a backup of the encryption key. You can use the encryption key backup if you forget your decryption password.
Exporting Your Encryption Key Backup
If you choose to export your encryption key backup for additional security, the Microsoft Certificate Export Wizard will run. The wizard will guide you through the creation and export of your encryption key to an external media source, such as a USB flash drive.
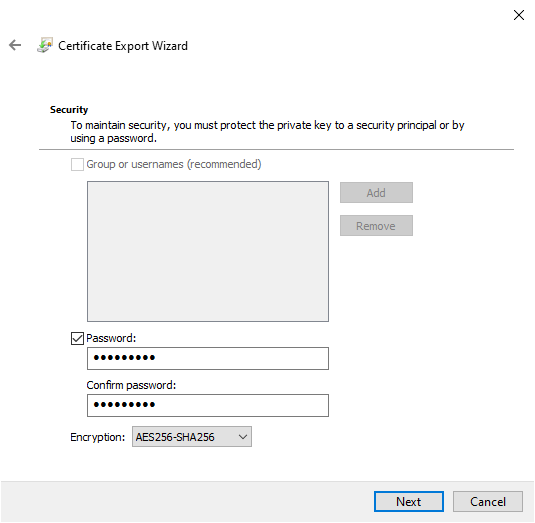
Select Personal Information Exchange from the first page, and check Export all extended properties. On the next page, you must input a secure and unique password to password protect your files. Switch the encryption type to AES256-SHA256 (extremely strong encryption!), then give your encryption key backup a filename. Press Finish to complete the process.
Once the process is complete, you’ll see a small lock icon on the Notepad text file icon, indicating its encryption status.
4. AxCrypt
Another handy tool for password protecting Excel sheets is AxCrypt, a handy yet powerful encryption tool.
Download and install AxCrypt. The first time you run AxCrypt, you’ll have to run through the setup. Importantly, you must provide a real email address during the sign-up process, or else you won’t receive your free AxCrypt license. After receiving the code, copy and paste it into AxCrypt before continuing.
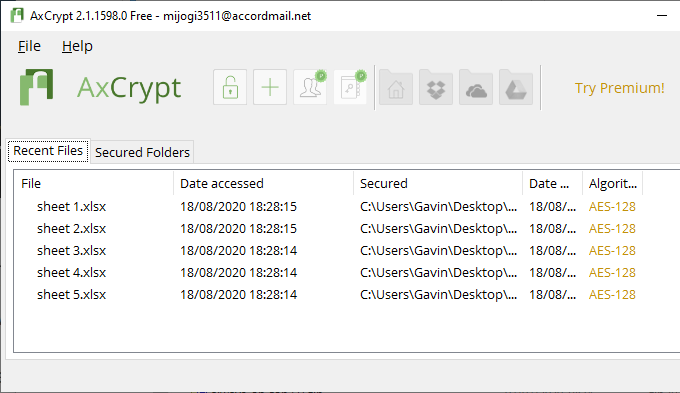
You also need to create a strong and unique AxCrypt password. The AxCrypt password acts as the encryption and decryption key for your Excel spreadsheets. Take heed of the AxCrypt warning. Restoring your password will only allow access to the account associated with the files. It will not allow you to decrypt files secured with an old password.
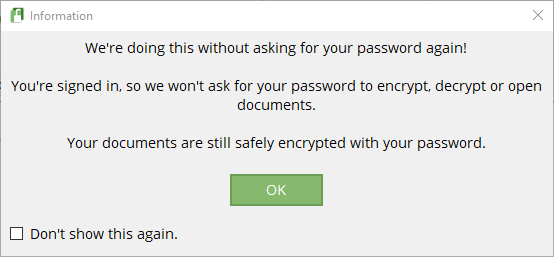
When you’re ready, drag and drop an Excel spreadsheet file into the AxCrypt window. If you are signed into AxCrypt, it will encrypt your files automatically. Similarly, if you are logged into AxCrypt and attempt to open a file, it will not present a password prompt. If you close AxCrypt (which also logs you out), you will receive a password prompt when you attempt to open the spreadsheet.
AxCrypt is a free encryption tool, which is why it features in our list of the best Windows freeware programs.
What’s The Best Way To Password Protect An Excel Spreadsheet?
In the old days, using Microsoft Office’s integrated password protection to password protect an Excel file or sheet was risky. The encryption algorithm was not strong enough and had multiple vulnerabilities, rendering it unusable. As Microsoft Office now uses AES-256, you can rest assured that the password protection on your Excel spreadsheet is trustworthy and impossible to break using current technology.
As the integrated password protection only handles one file at a time, you might also consider the 7-Zip encryption option. If you are dealing with a large volume of Excel spreadsheets that you want to protect, password protecting all of them in a single archive (with a strong and unique password!) is a handy option that also uses AES-256.
Wondering about a strong and unique password? Check out these easy ways to create a password you’ll always remember.


