You'll be very glad you do
Whether you’ve started using Windows 10 since it first came out, or only recently, you’ve probably noticed just how tremendously different it is than any previous version of Windows.
However, no matter how long people have been using Windows 10, there are always new features available in the operating system people don’t realize are there.

The following are 15 amazing features in Windows 10. A few of these have been there since the beginning, but many are new features added to the operating system in just the past year.
1. Windows Launcher Android Integration
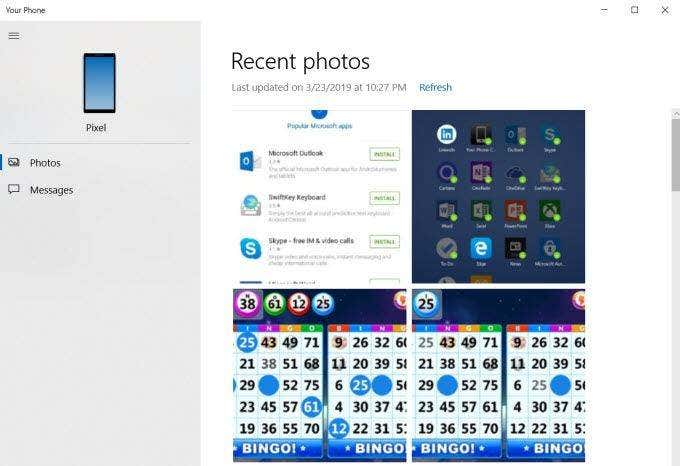
If you install the Microsoft Launcher app on your Android phone, it opens up an impressive array of ways you can sync and integrate your Android phone with your Windows 10 computer.
With this app installed, you can:
- View photos on your phone and drag them into your Windows apps.
- Send text messages from your phone using your computer.
- You can view your Windows 10 timeline from your phone.
- Mirror Android apps right on your Windows 10 PC
- Send websites directly from your phone to your PC.
How To Link Your Android and Your Window 10 PC
To set up this link between your phone and your Windows 10 PC, you just need to install the Windows Launcher app on your Android phone.
Then, on your Windows 10 PC, click the Start menu, type Phone and click on Link your phone.
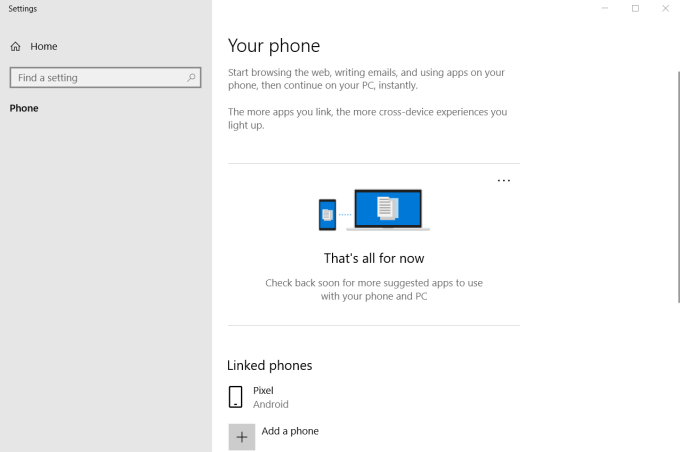
If you don’t see your phone already listed, click on Add a phone to link your Android phone.
Next, install the Your Phone app from the Windows Store on your Windows 10 PC. Once you’ve provided the app on your phone all the permissions it needs, you can launch the Your Phone app on your computer to interact with your phone.
You’ll be able to do things like see your recent messages or send text messages right from your computer.
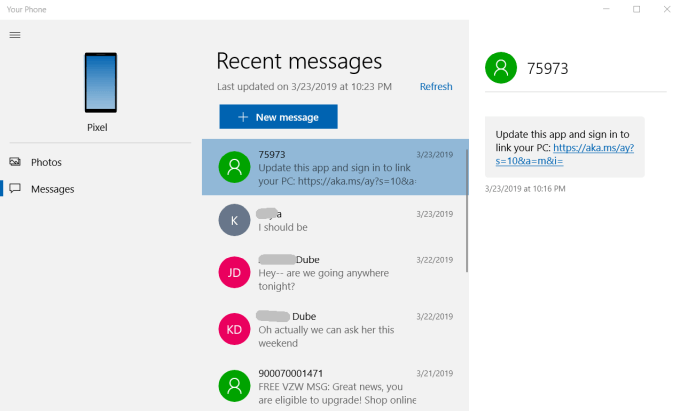
You can also see photos on your phone and easily transfer them back and forth.
It’s a very cool way to elevate your mobile experience by meshing your mobile and Windows 10 productivity into one.
2. Cloud Clipboard
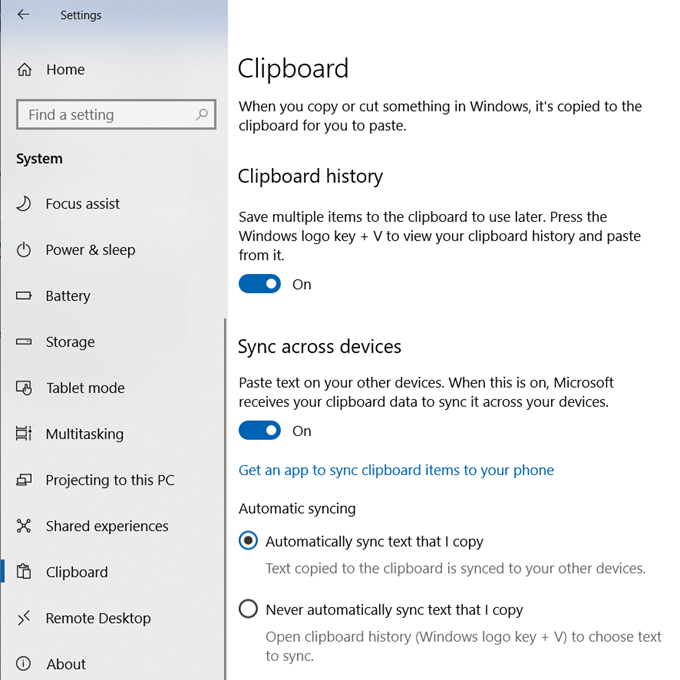
You’re probably already familiar with pressing Ctrl-C to copy selected items to your clipboard. But now you can press Windows Key-V to paste selected items from a cloud clipboard that you an access from any of your other devices.
Enable cloud clipboard by going into Settings, click Clipboard, and enable both Clipboard and Sync across devices.
To use this feature once enabled, just select the item you want to copy, press Ctrl-C like normal and then press Windows Key-V to see the cloud clipboard when pasting.
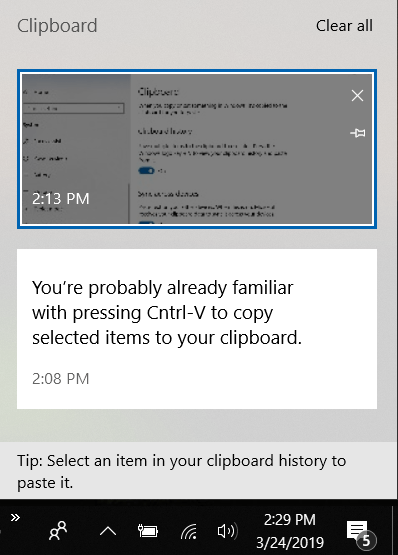
Using this clipboard to copy items means that even if you turn off one Windows 10 computer, you can log into another one using your same Microsoft account and access the same clipboard items.
3. Snip & Sketch
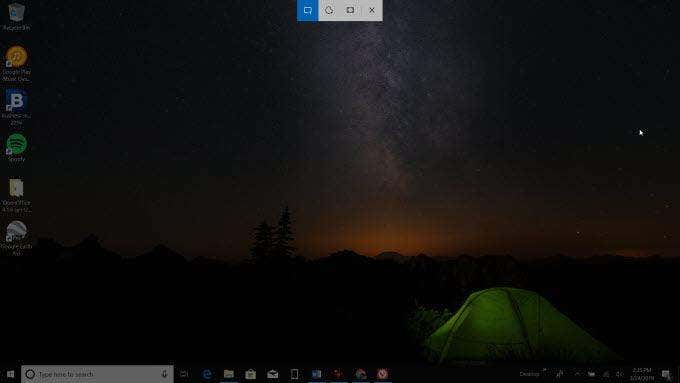
You’ve probably used Print Screen for years to take screenshots in Windows 10. But the Snip & Sketch utility takes screen capture to a whole new level.
You don’t have to enable anything, so long as you’ve updated your Windows 10 install with the latest updates. Press Shift–Windows Key–S to start your screen capture.
What makes Snip & Sketch special from the traditional Print Screen is that you can capture non-standard areas if you like (choose the freehand tool first), and after taking the screen capture, you can edit it and mark it up with your own sketches or notes.
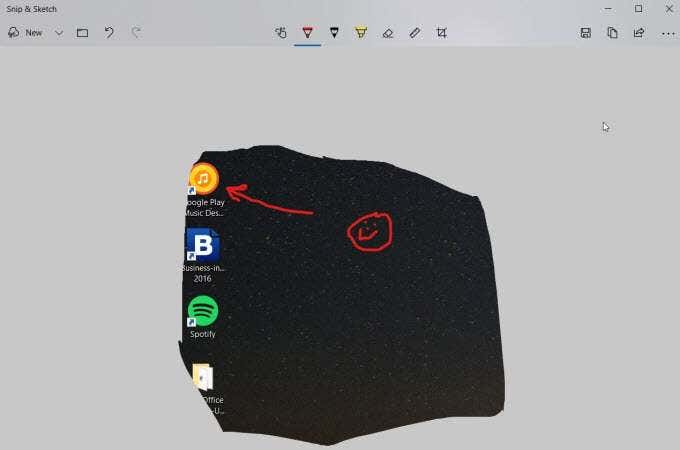
Installing third-party screen capture software is now a thing of the past.
4. Type with Your Voice
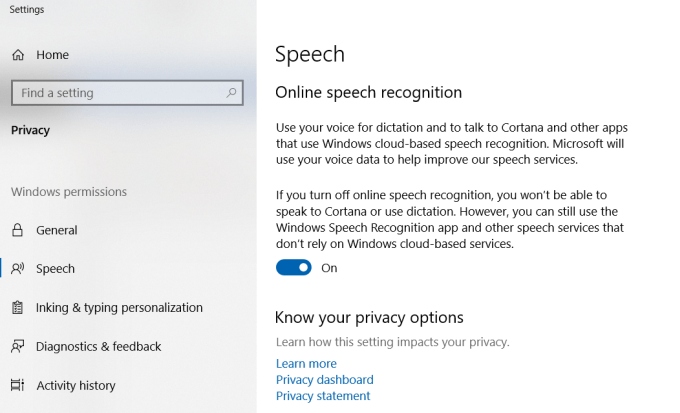
For years, voice dictation was something you needed to purchase expensive software for. Now, you only need Windows 10. Speech recognition and voice typing is now built right into the operating system.
To enable this, just go into Settings, click Speech, and enable Online speech recognition.
Once this is enabled, any time you have any application that requires text-typing, you can press Windows Key–H and type with your voice instead.
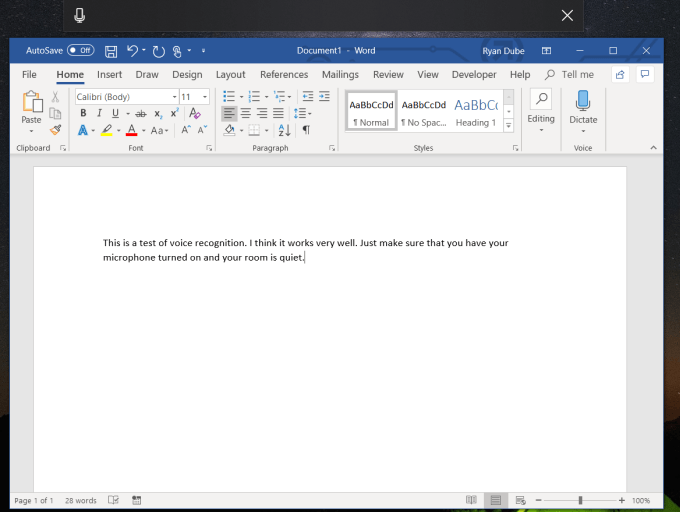
During our testing, we found that the voice recognition was very accurate and didn’t require any voice training time at all.
Using this feature in Microsoft Word works well because Word automatically capitalizes sentences for you and saying “period” automatically inserts the correct terminating character.
This feature is also great for quickly dictating emails or having IM conversations with friends.
5. Share to Skype
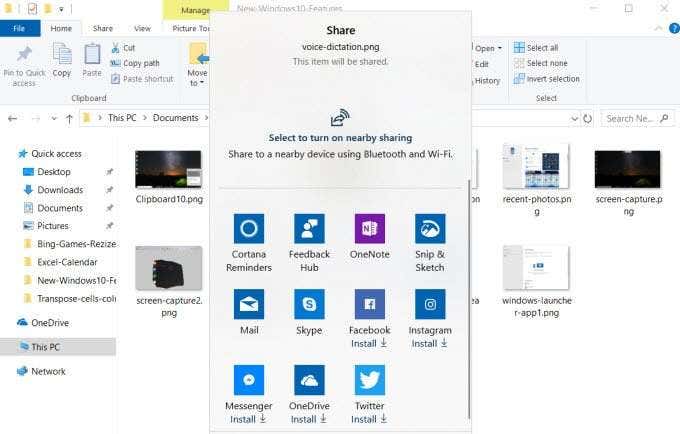
If you buy a new computer with Windows 10 on it, you’ll see that Skype comes prepackaged. Whenever you right-click on any file in Windows Explorer or click Share This Page in Edge, you’ll see Skype listed in the options at the bottom of the share window.
You’ll also notice that there are a number of other apps that display in the share window as well, including the Snip & Sketch tool, Facebook, Twitter, and OneDrive. Although, those apps need to be installed separately.
6. Secret Start Menu
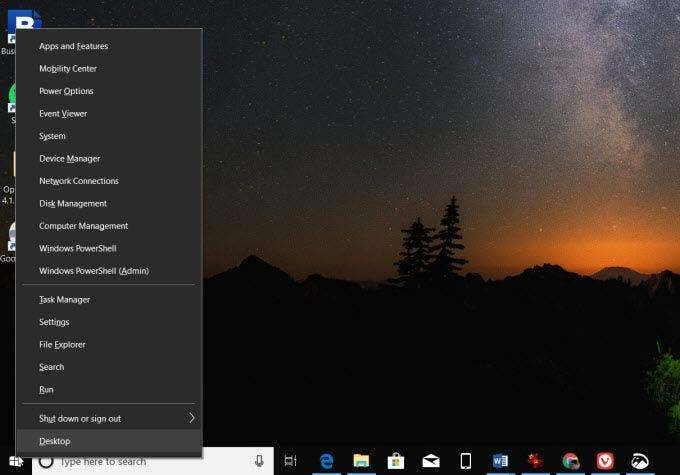
One thing that was very annoying about Windows 10 when it first came out was how hard it was to find those basic areas of Windows that were so easy to find in the traditional start menu.
You haven’t lost that in Windows 10. It’s actually accessible via a “secret” start menu by right clicking on the Windows start menu. From here, you can access frequently accessed areas like:
- Apps and features
- System
- Device Manager
- Computer Management
- Task Manager
- Settings
- File Explorer
You don’t have to be frustrated anymore. Just right-click.
7. Show or Peek at the Desktop
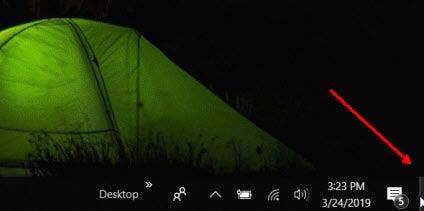
This feature is especially useful when you have information stored on the desktop, such as when you’re using desktop widgets to see system specs.
You can get a peek at the desktop by hovering your mouse on the small vertical sliver of a button at the lower right corner of the taskbar. Just hover to peek at the desktop or click on it to minimize all open windows and switch entirely to the desktop.
Just click it again to bring all the windows back up again.
8. Slide to Shutdown
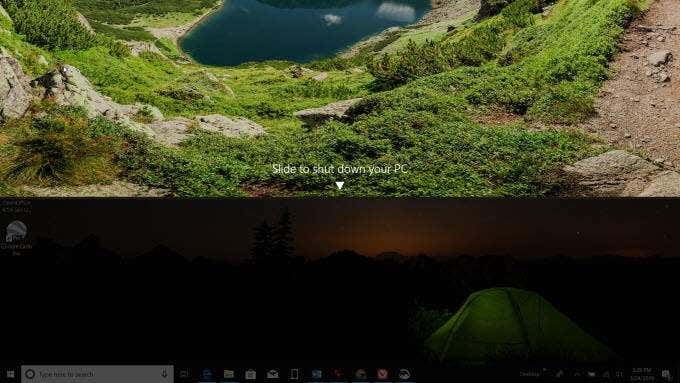
This is a very cool trick that only works in Windows 10. It’s a utility that presents a full-screen slide down bar that you can drag down to the bottom of the screen to shut down your computer.
To set this up, just right click on your desktop and click New and select Shortcut.
Past the following text into the text field.
%windir%System32SlideToShutDown.exe
Click Next and Finish.
Now, when you want to shut down the computer, you don’t have to click around looking for the shutdown option. Just double click the icon and drag the bar to the bottom of the screen to shut down the PC.
9. Windows 10 God Mode
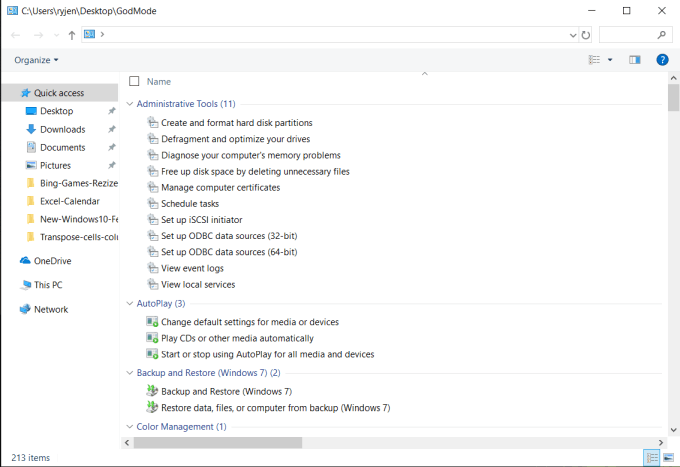
Just like most video games have a “god mode” that give you super human powers, Windows 10 comes with a god mode that’ll give you super human computer skills.
Just right-click on the desktop, select New, and click Folder. Rename the folder as:
GodMode.{ED7BA470-8E54-465E-825C-99712043E01C}
Once you open this folder, you’ll see a long list of advanced administrative features such as:
- Manage drives
- Schedule tasks
- View Windows event logs
- Manage devices and printers
- Customize the File Explorer
- Much more…
The contents of this folder are a power user’s dream come true. It’s everything you need at your fingertips.
10. Task View
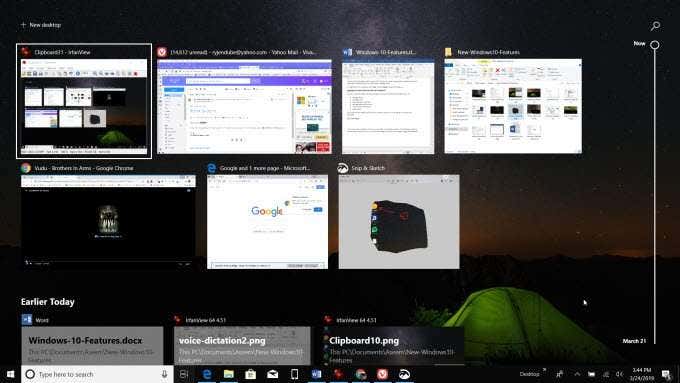
Even though Task View has been part of Windows 10 for a while, many users don’t even realize it exists. Those who do have realized some tremendous productivity boosts.
The Task View icon is on your task bar just to the right of the Cortana search field. It looks like a film strip.
When you click on it, you’ll see a list of all open applications, and if you scroll down, you’ll even see all of the files and applications you had open at some point earlier. You can switch to any open (or previously open) app or file just by clicking on it in the task view.
11. Virtual Desktops
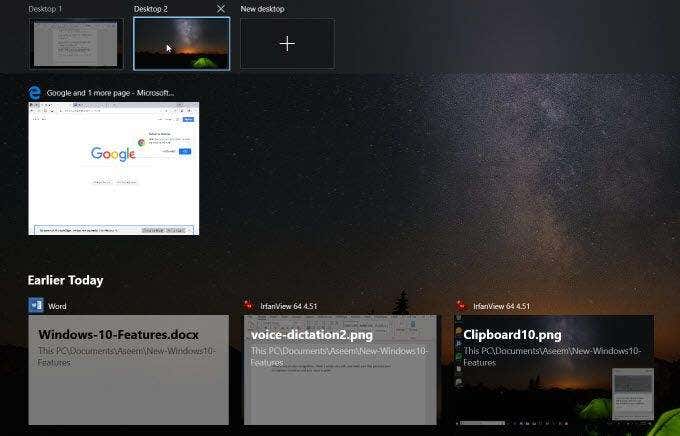
If you want to take your productivity to a whole new level, drag any of the open apps up to the New Desktop icon at the top of the Task View.
This creates a new virtual desktop session you can switch to and stay focused on the task at hand. This is great for creating one session for your social media or web browsing, and another desktop to stay entirely focused on your work.
Switch between desktops in the Task View window or by using the Ctrl + Windows Key + Left Arrow/Right Arrow keyboard combo.
12. Transparent Command Prompt Window

Using the command prompt window is very common for working on your Windows system. But sometimes the command window itself can get in the way when you want to see the effects of the commands you type.
You can get around this by making the command prompt window transparent.
- Open a new command prompt window by clicking Start, typing command, and selecting Command Prompt Desktop App.
- Right-click the title bar and select Properties.
- In the Properties window, click the Colors tab.
- Lower the Opacity level to around 60%.
You’ll be able to see right through the command window itself and watch the effects of each command you type.
13. Nearby Sharing
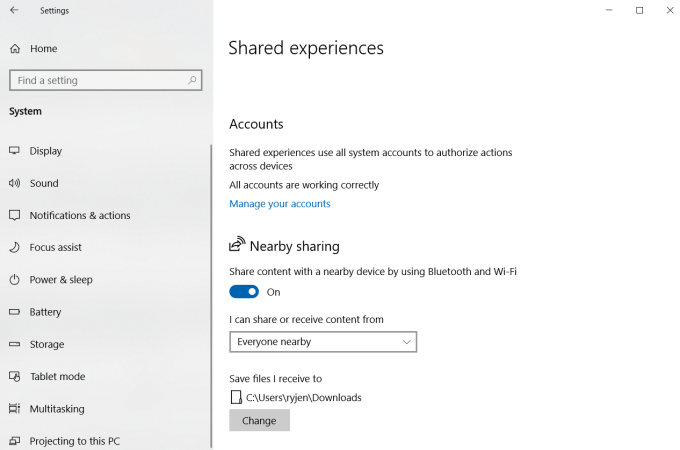
No longer will you need to connect your devices to your computer via a USB cable. Windows 10 features Nearby sharing, which lets you share content and files to devices connected to your Wi-Fi network or connected to your computer via Bluetooth.
To enable this feature:
- Open Settings.
- Select Shared Experiences.
- Enable Nearby Sharing.
Now, when you select Share in a Microsoft Word document, or select Share from right-clicking a file, you’ll see other Windows 10 computers connected to your network (or via Bluetooth) that you can share the file with. Keep in mind all computers should have Nearby Sharing enabled for this feature to work.
14. File Explorer Dark Mode
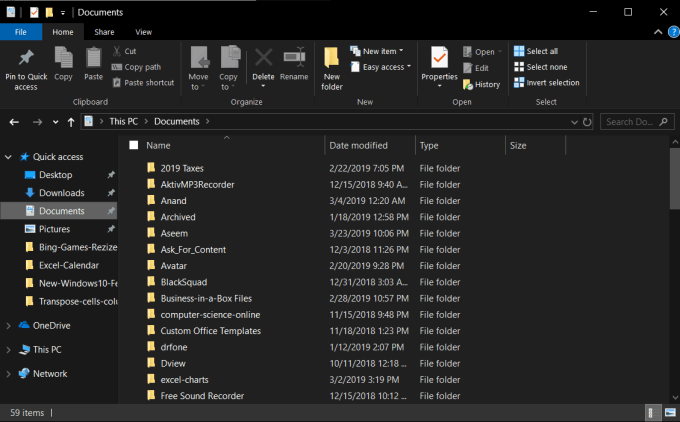
If you’re tired of the same old look to File Explorer, you can make things edgy by switching to File Explorer Dark mode.
How to enable File Explorer dark mode:
- Open Settings.
- Select Colors.
- Scroll down to Choose your default app mode.
- Select Dark.
Once this is enabled, all system windows (like File Explorer) will have a dark background. Not only does it look a lot edgier than the traditional File Explorer, but it’s also a lot easier on the eyes.
15. Notifications Area
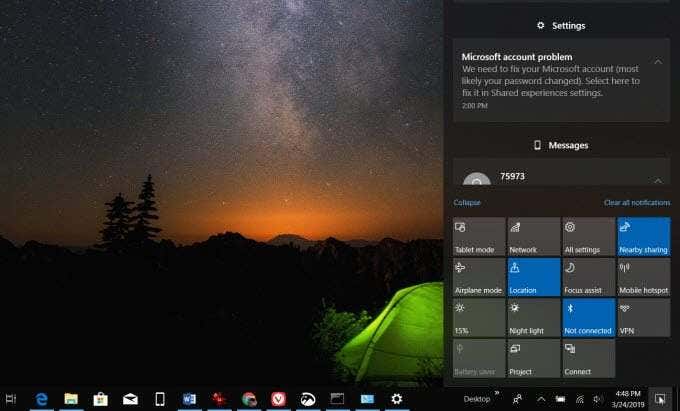
Everyone is very accustomed to receiving notifications on their mobile phone, but many Windows 10 users don’t realize they have access to a convenient notifications area on their Windows 10 machine as well.
You can access notifications by clicking the comments icon in the lower right corner of the screen. This pop-up shows notifications from your apps like your calendar, your mobile notifications if you have your phone synced, and buttons to quickly enable your Wi-Fi network, Bluetooth, access Settings, and more.
Windows 10 Features
It’s amazing how easy it is to get accustomed to using Windows 10 a certain way. You get into a certain pattern of doing things and may not realize when Microsoft has introduced some fresh and innovative new features into the Windows 10 operating system.
Take a test drive of all of the new Windows 10 features listed above and enhance your productivity and overall Windows experience.


